Letters and text
Goal
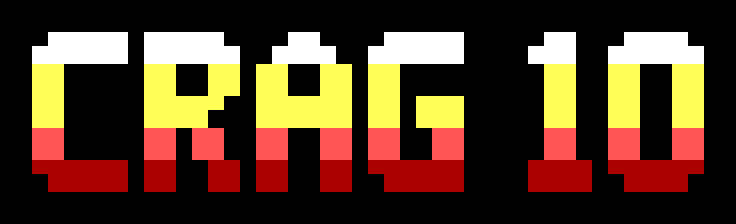
Letter a title by hand so that it reads at 1×, and know when to use the Text tool and TheDraw fonts instead. You'll draw CRAG 10 in a face ten pixels tall on a Pixels layer, with the Half-Block Brush, and colour it by cell row. Shown at 2×:
The idea
A face on the pixel grid
A half-block cell is two pixels, one above the other, and a pixel is one column wide (tutorial 03). So a face ten pixels tall takes five cell rows. The face here has stems two pixels wide and bars two pixels tall. Its letters are six columns wide, and the 1 is four. A # is a pixel:
.#####  #####.  ..##..  .#####  .##.  .####.
######  ######  .####.  ######  ###.  ######
##....  ##..##  ##..##  ##....  .##.  ##..##
##....  ##..##  ##..##  ##....  .##.  ##..##
##....  #####.  ######  ##.###  .##.  ##..##
##....  ####..  ######  ##.###  .##.  ##..##
##....  ##.##.  ##..##  ##..##  .##.  ##..##
##....  ##.##.  ##..##  ##..##  .##.  ##..##
######  ##..##  ##..##  ######  ####  ######
.#####  ##..##  ##..##  .#####  ####  .####.
The rows go in pairs: when a letter starts on an even pixel row, its pixel rows 0 and 1 are one cell row, 2 and 3 the next, and so on. A cell with both its pixels set is █. A cell with one, like the round corners of the C and the end of the R's bowl, is ▀ or ▄. The face's bars, such as the G's middle bar and the 1's foot, are two pixels tall and start on even rows, so they are whole █ cells.
Letters that misread at 1×
At 1× a cell is a character on screen, and one cell more or less of ink can turn a letter into another. Three misreads come up again and again in hand-drawn titles: a C that reads as G, an R that reads as A, and a 0 that reads as D. In each group of three below, the first letter is the misread, the second the letter it reads as, and the third the fix; the grey label under each says which letter it is. At 1×:

And at 2×:

All of them are yellow on black, cell rows 1 to 5; each is six columns. The cells of each, top row first, with · for a blank cell:
| Letter | Row 1 | Row 2 | Row 3 | Row 4 | Row 5 |
|---|---|---|---|---|---|
| C with a spur | ▄█████ |
██···· |
██···· |
██··██ |
▀█████ |
| G | ▄█████ |
██···· |
██·███ |
██··██ |
▀█████ |
| C, open | ▄█████ |
██···· |
██···· |
██···· |
▀█████ |
| R with a shut bowl | █████▄ |
██··██ |
██████ |
██··██ |
██··██ |
| A | ·▄██▄· |
██··██ |
██████ |
██··██ |
██··██ |
| R with a leg | █████▄ |
██··██ |
████▀· |
██·██· |
██··██ |
| 0 with square corners | ██████ |
██··██ |
██··██ |
██··██ |
██████ |
| D | █████▄ |
██··██ |
██··██ |
██··██ |
█████▀ |
| 0, round | ▄████▄ |
██··██ |
██··██ |
██··██ |
▀████▀ |
- C as G. A spur on the lower arm,
██in the last two columns of row 4, is the G's lower jaw: the C with a spur and the G differ only in row 3, where the G has its bar. Keep the C open: its lower arm is row 5 alone, and row 4 is██····. - R as A. A bowl that shuts with a bar right across, into a right stem that runs on to the foot, is the A's shape. The R with a shut bowl and the A differ only in row 1, the top. Give the R an open bowl and a leg: the bar under the bowl stops short of the right stem (
████▀·on row 3), and a leg steps down to the right (██·██·on row 4) to the foot. - 0 as D. Square corners read as a D or a B. The 0 with square corners and the D differ in two cells, the right-hand corners:
█against▄on row 1 and█against▀on row 5. Round all four corners. In this face the round 0 is the shape an O would take, so where a title has both an O and a 0, slash the 0 right across, corner to corner, instead.
Look at your lettering in the Preview (1x) dock (Window > Preview (1x)) before you go on. A letter that reads at 2× and in the zoomed canvas can still misread at 1×.
Spacing
CRAG 10 is set with letters one pixel apart and a word gap of four pixels. The rule: a word gap must be visibly wider than the gap between letters, or the words run together. Set two words with one-pixel gaps throughout and they read as one word (Check it below).
Leave a pixel of space between the letters and anything they sit in, a plate, a frame or a box: a stem that touches the frame merges with it, and the letter can turn into another.
Colour by cell row
Colour the letters by cell row: white along the top row, yellow, then light red, then red at the foot. Each cell row is one colour, so no cell of a letter needs two colours of ink, and the bright top reads as light from above. On a Pixels layer this takes one stroke of the Rectangle a row, with the layer's alpha locked: with Alpha lock on, the brushes and shapes paint only the pixels already set (tutorial 04), so a filled rectangle across the whole row recolours the letters and leaves the black around them.
Text layers and TheDraw fonts
Hand lettering is one way to get letters on the canvas. The other is the Text tool (Tools > Text, Ctrl+Shift+X), which "writes live text in a font: a bundled face or a TheDraw font. The text stays editable on its own layer." Click on the canvas and type: the text goes on a new Text layer, named Text N, just above the active layer. Click a Text layer with the Text tool to edit its text again. Painting tools can't change a Text layer's letters.
The text's settings are in the Tool Options dock, and each change is one undo step:
| Row | Sets |
|---|---|
| Face | The face the text is set in, from the face picker |
| Big style | None, or whole-cell letters from the IBM 8×8 font: Big shadow, Big 3D, Big outline, Big block or Big rainbow, with their Colours beside it. A big style greys out Face and Colour |
| Colour | The letters' colour, one of the 16, in a bundled face. A TheDraw font ignores it and draws in its own colours: an outline or block font grey on black, a colour font in the colours stored in the font. A layer style with Fill switched on (Layer > Layer Style…, the Layer menu) recolours the letters in any face: Flat sets a bundled face's letters, and each TheDraw cell's foreground, to its Colour (flat), and leaves a TheDraw cell's background as the font has it |
| Case | As typed or Capitals |
| Wrap | None, or the width lines wrap at, in columns |
| Align | Left, Centre or Right: where each line sits in the text's box |
| Spacing | Letters, blank columns between letters on top of the face's own, and Lines, blank cell rows between lines, each 0 to 64 |
A text step in a replay steps file clicks, types and sets these rows too, in a bundled face or in a TheDraw font from a .tdf file the steps file names (A TheDraw font), and blockwright --screenshot pictures it (The text tool).
The faces are Blockwright's three bundled ones, block, vga and mini, and the TheDraw fonts (.tdf) in your fonts folder. Blockwright ships no TheDraw fonts. Set the folder in Edit > Preferences, on the Fonts tab, under Fonts folder; with none set, Blockwright looks in ~/tdfiglet/fonts if it is there. The tab counts the fonts it read and lists the files it couldn't. With no folder, text layers can use the bundled faces and the fonts a project already holds.
The face picker has a Search faces box (it searches face names, file names and types), a Font type selector and a star to keep a face among your favourites. Under a face's name it marks two things about the text you are writing:
- missing, then the characters of your text the face has no glyph for;
- confusable, then the pairs of letters in your text the face draws alike. In a bundled face that is two letters whose pixels, lined up on the left and on the baseline, differ in at most two pixels, or match but for a shift of one pixel. A TheDraw font is compared by cells, not pixels: every cell of a letter counts as both its pixels, whatever its character and colours, unless it is blank (a space, NUL or no-break space that doesn't blink, on a black background, palette or RGB; or an empty cell the letter leaves), and the same rule is applied to those coarse shapes. A blinking space on black counts as ink. So the mark says two letters fill nearly the same cells, not that they look alike: it can mark a pair whose drawings differ by several pixels, and miss a pair a pixel or two apart where those pixels sit in cells only one of the letters uses.
The confusable check covers the pairs within three sets only: ZB8S5O0I1, Z2zMWKAH and l23456_, and only where both letters of a pair are in your text. C/G, R/A and 0/D are not among those pairs, so the picker never marks the three misreads above, in any face: check those by eye, at 1×. The bundled block and vga faces have no confusable pairs in the three sets; mini has S/5, O/0, Z/2 and K/H. In a TheDraw font, check a marked pair by eye too.
Two rules for TheDraw fonts that come from hand lettering:
- Judge a face by its letters in one colour at 1×, in the Preview (1x) dock, with the letters your title has: two letters a coloured, zoomed-in view keeps apart can merge in one colour at 1×. An outline or block font is already one colour, grey on black. A colour font isn't, and the Text tool's Colour doesn't change it: give its Text layer a layer style with only Fill switched on, Mode Flat, which sets every cell's foreground to one colour, and take it off again with Edit > Undo (one step). Flat Fill makes the foregrounds one colour but leaves each cell's background as the font has it, so a colour font that draws on coloured backgrounds, ▓ on blue say, is still not one colour. To see that one in one colour, bake the layer (Layer > Bake Layer, which keeps the Fill in the cells and drops the editable text) and recolour its backgrounds with the Colorize Brush (Tools > Colorize Brush, Ctrl+Shift+C): set the pen's background to black (right-click black in the palette, or Colours > Default Colours, Ctrl+D) and drag across the letters with the right mouse button, which sets backgrounds only and keeps every glyph and foreground. A Text layer takes no brush, so the bake comes first. With iCE colours on (View > iCE Colours), a cell the font makes blink shows a bright background whatever the brush sets; turn iCE off while you look. Edit > Undo takes it all back: one step for each drag, the iCE switch, the bake and the style.
- Where a face's space is no wider than its gap between letters, a title in it runs its words together. Put each word on a Text layer of its own and move the layers apart (Alt+drag, or the Move/Transform tool, Ctrl+Shift+J).
A project keeps a Text layer live. Its layers/<id>.json holds the text and its settings under "source" for a bundled face and under "tdfSource" for a TheDraw font (and "bigSource" or "bigRainbowSource" for a big style), and a project with text in a TheDraw font carries a copy of each font file it uses, as fonts/<sha256>.tdf, so it opens with its text editable on a machine without the font (Projects (.bwp)). An .ans keeps only the cells.
When the text is final and you want to paint over it, Layer > Bake Layer makes the Text layer a Cells layer of what it shows. The text can't be edited after, except by undoing the bake, which is one step.
One compositing rule matters when you mix the two: a glyph a Text layer writes, in normal or chars-only mode, stays in front of any Pixels layer, above or below it, until a Cells or Generator layer above the text writes its own glyph there (How the layers combine). Text set over a pixel backdrop needs no layer order to show; to put pixels over text, bake the text first.
Do it
You'll draw the letters on a Pixels layer, look at them at 1×, and colour them. The positions are column then row from 0, 0 at the top left; zoom in (Ctrl+=) so you can count cells. The Half-Block Brush and the Rectangle take pixel positions, as in tutorial 03: the column, then the pixel row, two to a cell row, so cell row 1 holds pixel rows 2 and 3. Set the options in the Tool Options dock; they carry over from tool to tool, so each step gives only the ones it changes.
-
A new canvas. On the start screen, set Width to 46 and Height to 7, leave iCE colours ticked, and press New.
-
A layer for the letters. Press + Pixels under the list in the Layers dock (Layer > New Pixels Layer). Double-click the new layer's name and type
title:
-
The pen. Take the Half-Block Brush (Tools > Half-Block Brush, Ctrl+B). Check that Pencil 4-connected is ticked and Alpha lock is not, and set Symmetry to Off. Left-click yellow, the fifteenth swatch:
-
C and R. Draw each letter from the face above, a pixel for each
#, with its top left corner at pixel row 2: the C from column 2, the R from column 9. Click a pixel at a time, or drag along a stem; with Pencil 4-connected a drag steps only sideways and up or down, so it doesn't cut a corner: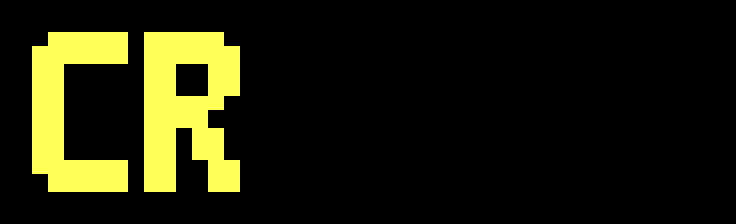
The C is columns 2 to 7 and the R columns 9 to 14, rows 1 to 5, with column 8 blank between them: the one-pixel letter gap. Row 1 is
▄█████for the C and█████▄for the R: the C's top left pixel is empty, and the R's top right. -
A and G. The A from column 16, the G from column 23:
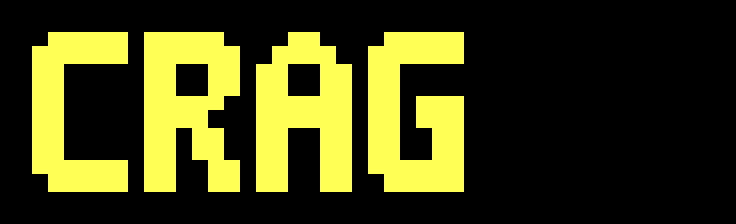
The G's bar is row 3,
██·███from column 23 to 28. -
The 10. Leave four blank columns, 29 to 32, for the word gap. The 1 goes from column 33 and the 0 from column 38:
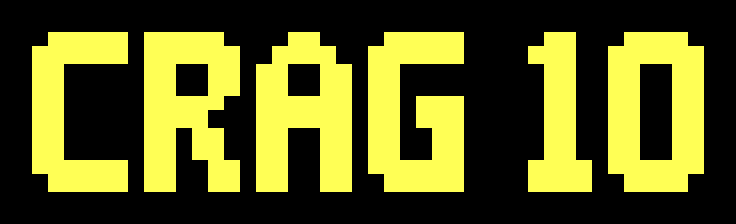
The 1 is columns 33 to 36,
▄██·on row 1 and████on row 5. The 0 is columns 38 to 43,▄████▄on row 1 and▀████▀on row 5. -
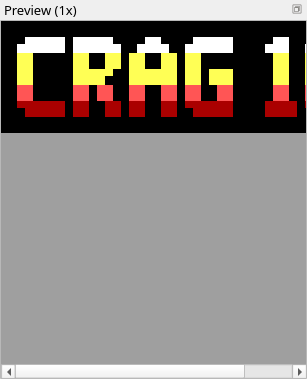
Read it at 1×. Open the Preview (1x) dock (Window > Preview (1x)) if it isn't showing. Check each letter: the C open, the R with its leg, the round 0, the gap after the G. The dock is narrower than this canvas, so it shows the left part, through the 1 and a sliver of the 0, and scrolls for the rest. Here it is with the colours of the last step:
-
Lock the layer. Tick the Alpha Lock box in the title row of the Layers dock (or Alpha lock in Tool Options). From here on the tools paint only the letters' pixels.
-
Colour the rows. Take the Rectangle (Tools > Rectangle, Ctrl+U) and tick Filled (Tools > Filled Shapes, Ctrl+Shift+F). Left-click white, the last swatch, and drag from
0, 2to45, 3: cell row 1. Left-click light red, the thirteenth swatch, and drag from0, 8to45, 9: cell row 4. Left-click red, the fifth swatch, and drag from0, 10to45, 11: cell row 5. Rows 2 and 3 stay yellow:Row 1 is the same glyphs as before in white; rows 2 and 3 are still yellow, and row 4 is light red. On row 5 the cells with both pixels set are red spaces, the background red, and the C, the G and the 0 each keep a
▀red on black at their round corners, at columns 2, 23, 38 and 43. Everywhere else on the canvas is blank, a space on black.
Check it
Make the word gap wider than the letter gaps. CRAG 10 with a one-pixel gap after the G, the same as between the letters:
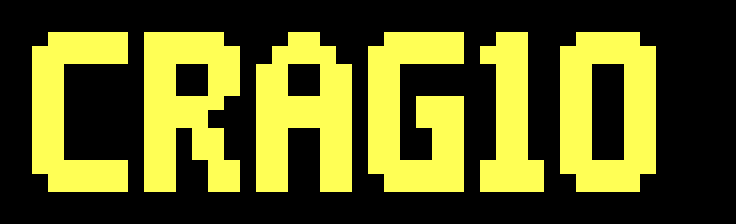
The G ends at column 28, column 29 is blank, and the 1 starts at 30. Nothing tells the eye where the word ends.
Lock the layer before you colour the rows. The three rectangles of step 9 with the layer's alpha unlocked:
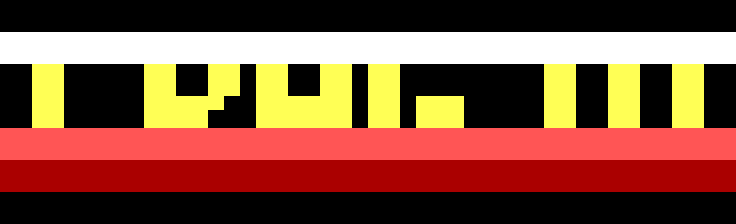
Row 1 is white █ across all 46 columns and row 4 light red █; row 5 is spaces on red across the whole row. A filled rectangle on an unlocked layer sets every pixel it covers, black ones included, so the letters' tops and feet are lost in the bands; only rows 2 and 3, which no rectangle covered, still show the yellow letters. Undo the three rectangles (Ctrl+Z), lock the layer, and draw them again.
Try it
Download try.bwp and open it (File > Open, Ctrl+O):
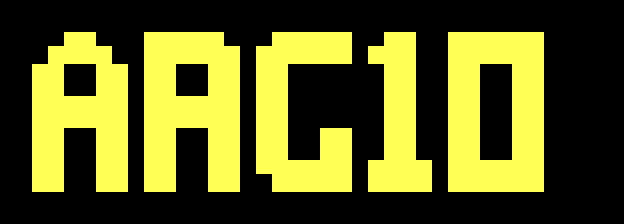
It is meant to say ARC 10, drawn on a title Pixels layer in this tutorial's face.
- Read it at 1×. Which letters misread, and as what? What else is wrong?
- Fix it on the title layer.
Answers
-
Three of the five letters are the misreads above, and the word gap is the same as the letter gaps. The R, columns 9 to 14, is the R with a shut bowl: it reads as A, and it differs from the A at columns 2 to 7 only in row 1. The C, columns 16 to 21, has the spur,
██at columns 20 and 21 on row 4, and reads as G. The 0, columns 28 to 33, has square corners,██████on rows 1 and 5, and reads as D. The 1 starts at column 23, one blank column after the C, so the title runs together as one word, and can read asAAG1D. -
Take the Select tool (Tools > Select, Ctrl+E). Select from
9, 1to14, 5and press Del (Edit > Delete); do the same from28, 1to33, 5, and from20, 4to21, 4for the spur. On a Pixels layer the cleared cells are transparent, so they show the blank Background. Selection > Deselect (Ctrl+Shift+A). Take the Half-Block Brush (Ctrl+B), yellow, and draw the R with a leg from column 9 and the round 0 from column 28, both from pixel row 2. Then, with the Select tool, select from23, 1to33, 5, press → three times to move the 10 three columns right, and press Enter to put it down: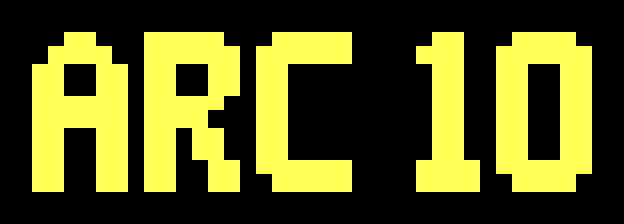
The R is
████▀·on row 3 and██·██·on row 4. The C's row 4 is██····. The 1 is now columns 26 to 29 and the 0 columns 31 to 36,▄████▄on row 1 and▀████▀on row 5, with columns 22 to 25 blank between the C and the 1: a four-pixel word gap.
Tutorial 11, Made for IRC, goes on from here: the 407-byte line budget, the row meter, and getting a piece onto IRC.
Describes Blockwright 0.1.0 (12ee9ef).